HighRadius Configurations
This section provides instructions on HighRadius Configurations.
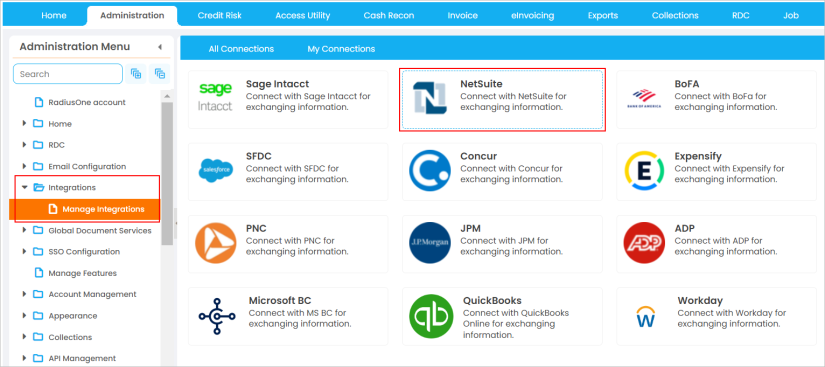
Managing Integrations
For managing API Integration UI, follow these steps:
-
Navigate to Administration > Integrations > Manage Integrations.
-
You can access the quick connection setup of NetSuite from All Connections tab.

Note
You can also navigate to the My Connections tab, and click the Add button to create a new integration. The Add Integration window is displayed.
-
Enter the Name and Description (if you are opting for the quick access option, the Name and Description are auto-populated, whereas for Add button, you must mention the name and description manually).
-
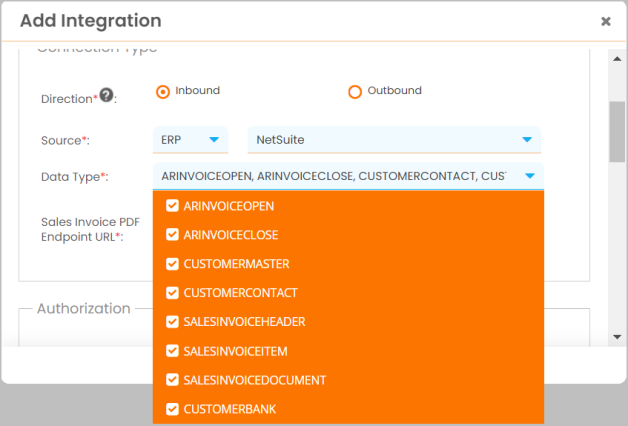
Connection Type section has two directions of data flow:
-
Inbound Data Types:
-
ARINVOICEOPEN
-
ARINVOICECLOSE
-
CUSTOMERMASTER
-
CUSTOMERCONTACT
-
SALESINVOICEHEADER
-
SALESINVOICEITEM
-
SALESINVOICEDOCUMENT
-
CUSTOMERBANK
-
-
Outbound Data Types: PAYMENTBATCHESOUTPUT
-
|
|
Note In case of API Integration, two independent configurations must be created for Integration in the HighRadius UI.
|
Configuration 1
-
Click the radio button beside Inbound direction.
-
Select ERP from the drop-down list and then select NetSuite as the source.
-
Select the data types:
-
ARINVOICEOPEN
-
ARINVOICECLOSE
-
CUSTOMERMASTER
-
CUSTOMERCONTACT
-
SALESINVOICEHEADER
-
SALESINVOICEITEM
-
CUSTOMERBANK
-
SALESINVOICEDOCUMENT
-
-
Additionally, as RESTlet scripts are used for Sales Invoice PDF authorization, a specific Endpoint URL must be specified for this configuration.
-
Refer ERP Enablement to understand the steps on fetching the endpoint URL for Sales Invoice PDF (keyword: HRC RT Sales Invoice PDF).
-
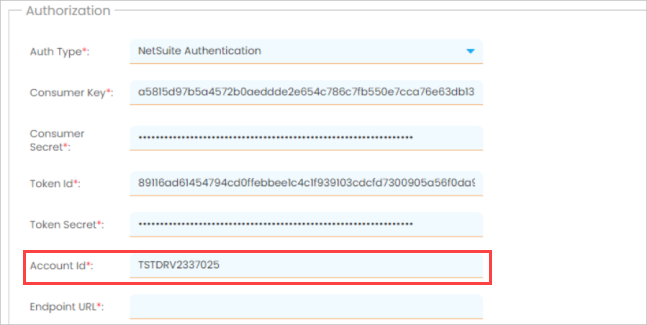
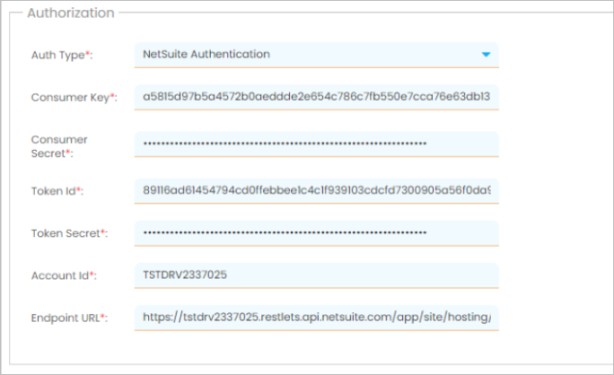
Select NetSuite Authentication as authorization type.
-
To fetch the authorization field values, refer to ERP Enablement.
-
In this case,
Consumer Key - a5815d97b5a4572b0aeddde2e654c786c7fb550e7cca76e63db1313aa8486378
Consumer Secret - 2470c09c2f32028d000314c3efdb81fe6715aa792bd5628a3e3d7ae7ee6977b0
Token ID - 89116ad61454794cd0ffebbee1c4c1f939103cdcfd7300905a56f0da9ea998c2
Token Secret - 443ec42c72a32c43c85b9fca8f2fc667174ab962d1065693ca619c2c495855e7
-
To obtain the account ID of your NetSuite account, follow one of the steps mentioned below:
-
Option 1
-
Log in to your NetSuite Account.
-
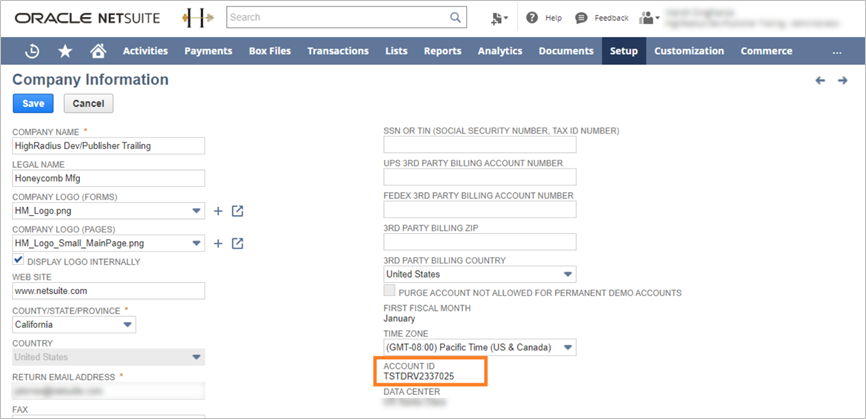
Navigate to Setup > Company > Company Information.
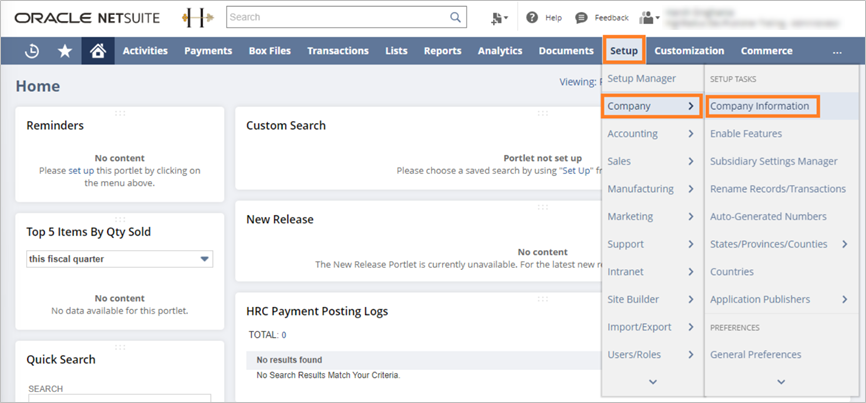
The Company information page is displayed.
-
Copy the Account ID for integration requirement from this page, refer to the following figure.
-
-
Option 2
-
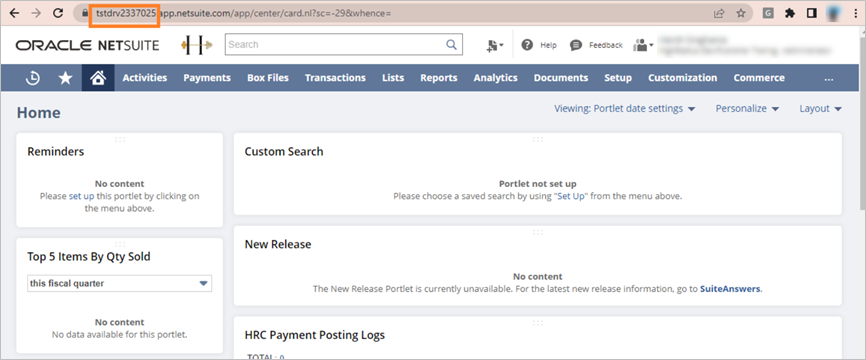
Log in to your Netsuite Account.
-
Copy the Account ID from the page URL, refer to the following figure.
-
-
-
To fetch the endpoint URL, refer to the following:
Note
Some hyperlinks and their drill-down documents can have restricted access only to HighRadius. Contact the HighRadius Account Manager for access.
-
Provide all the field details or values according to your account specification.
Configuration 2
-
Click the radio button beside Outbound direction
-
Select ERP from the drop-down list, and then select NetSuite as the source.
-
Select the data types:
-
PAYMENTBATCHOUTPUT
-
UPDATECUSTOMER

-
-
Select Auth Type as NetSuite Authentication.
-
Enter the Authorization field values as mentioned in Configuration 1.
-
Additionally, as RESTlet scripts are used for Payment Posting authorization, a specific endpoint URL must be specified for this configuration.
-
Refer ERP Enablement to understand the steps on fetching the endpoint URL for Sales Invoice PDF (keyword: HRC RT Customer Payments API).
-
In this case, we are using the Endpoint URL as:
https://tstdrv2337025.restlets.api.netsuite.com/app/site/hosting/restlet.nl?script=568&deploy=1
-
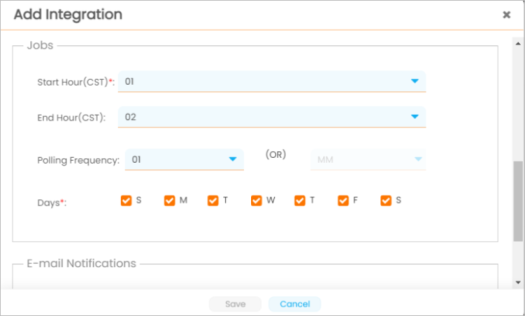
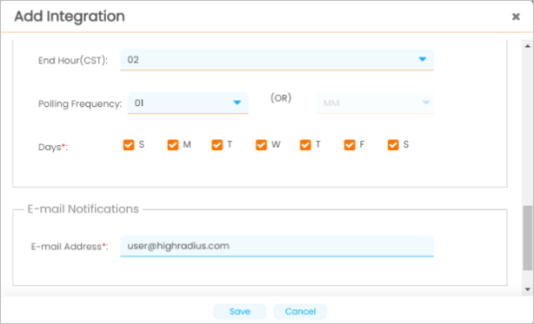
Configure cron as required.
-
Provide email ID(s) to get job status notifications.
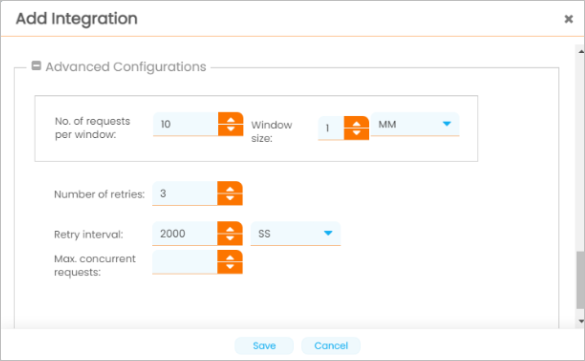
Advanced configuration - Change advanced configuration only if required
No. of request per window - Number of request allowed per time frame (window size)
Window size - Time frame
For example, 10 requests allowed per minute
Number of retries - Number of time request is resubmitted in case of failure
Retry interval - Interval between retries
For example, Retry 3 times with 2000 seconds retry interval
Max concurrent request - Not implemented yet
-
-
Click Save.
Add - To add a new data type to existing integration
Edit - To modify cron of data type
Delete - To delete data type
Run Now - Full load - Triggers job to pull all records
Run Now - Delta - Triggers job to fetch records which modified or created after last run